Guff - Blog & Magazine WordPress Theme
Theme Created: 14 November 2023
Documentation Created: 14 November 2023
Documentation Updated: 14 November 2023
Author Profile: https://themeforest.net/user/frenify/portfolio
Introduction
First of all, Thank you so much for purchasing this template and for being our loyal customer. You are awesome!
This documentation is to help you regarding each step of customization. Please go through the documentation carefully to understand how this template is made and how to edit this properly.
WordPress General

A working version of WordPress.org must be installed before you can install the Guff. If you need help installing WordPress, follow the WordPress Codex
Before using any theme, it is important to understand how native WordPress functions work, and how to establish ownership of your new site.
WordPress links you will find useful:
- WordPress Codex: General information about WordPress and how to install it on your server.
- First Steps With WordPress: General information about WordPress.
- FAQ New To WordPress: The most popular WordPress FAQ’s
Theme Installation
To use Guff WordPress Theme, you must be running WordPress 6.0 or higher, PHP 5.6 or higher, or higher and mysql 5 or higher version. Below is a checklist of items your host needs to comply with to ensure proper Guff operation:
- Ensure your web host has the minimum requirements to run WordPress.
- Make sure the latest version of WordPress is up and running.
- If necessary, you can download the latest release of WordPress from the official WordPress website.
There are two methods to install the theme. If the normal installation method [a] is not supported by your web host, you will have to use the alternate option [b].
a) Normal Installation
- Login to WordPress Admin and browse to Appearance > Themes.
- Click on the Add New Theme (or "Install Themes" tab for older versions) and click Upload.
- Browse your computer to select "guff.zip" (it's in the zip file you downloaded from ThemeForest). Click "Install Now" button.
- Once it's uploaded, click the Activate link.
b) FTP Installation (alternate method)
- Use your FTP software to browse to wp-content/themes folder.
- Upload the guff folder.
- Once it's uploaded, go to your WordPress Admin, browse to Appearance > Themes.
- Click the Activate link.
Demo Content Import
Before we start to import a demo content we have do following instructions:
-
Set up PHP Configuration limits
Issues you may encounter, such as demo content fails when importing and similar issues, are generally related to excessively low PHP configuration limit settings. You can either increase these limits on your own, or contact your web host and ask to have the limits increased to the following minimums:
- memory_limit - 96M
- max_input_vars - 3000
- max_execution_time - 600
- post_max_size - 32M
- upload_max_filesize - 32M
- allow_url_fopen - ON
-
Verify your PHP limits
You can check them by installing the WordPress phpinfo() plugin and checking Settings. The first column refers to your installation value, and the second column refers to the limits of your host. The latter values are often lower if you have selected a cheaper hosting package.
Now we are ready to import a demo content
There are two methods to import a demo content. If you have SSL Certificate on your website you can use method [1] One Click Demo Importer (auto), but if you have not installed SSL Certificate or you couldn't import a demo content via method [1] you can use method [2] with XML File (manually).
Let's take a look at both methods.
Video Guide
Installation and import a demo content
One Click Demo Importer
- Go to Dashboard > Guff > Import Demo Data
- Click on Import Demo Data button
- Click on Continue & Import button
- Ready
Setup Homepage
Homepage is made with the help of our "FREL ELEMENTS" and "Elementor Page Builder" elements. Add any element to the page as you wish.
- Pages -> Add New
- Insert Title
- Switch to Elementor Page Builder
- Drag and Drop any Elements from FREL ELEMENTS or Elementor Elements
- Page Options - make changes as you wish
- Click the "Publish" button
After you create homepage:
- Settings -> Reading -> Front page displays
- Choose a "Static Page"
- Set newly created "Home" page.
- Click "Save Changes" button
Adding Posts
Adding a new post is the same way as default WordPress installations, however, there are extra options that might need explaining.
>> Featured Image
While the theme can function without featured images, it's highly recommended that you add a featured image to each post. This not only makes your site/blog more lively but also improves user experience.
To set the featured image, use the WordPress normal method.
>> Recommended Image Size (for Blog Posts)
Image size (dimensions) will depend on what type of layout you're using throughout your WordPress installation or per individual post basis. This image will not only be used on the post, but also on the category listing pages.
Compatible with all layouts and default slider: 1920 x auto (width x height)
Author Avatar
The theme uses Gravatar to display users avatars . to craete or change your Gravatar :
If you have never setup a Gravatar account:
- Register / login to Gravatar. Upon registering, use the same email address that is associated with your WordPress User Profile.
- Upload your photo and associate it with that specific email address.
If you already registered at gravatar.com, follow these steps:
- Click on "My Gravatars" .
- Click on "Add a New Email" .
- Then, you'll need to click on "Add a New Image" .
- Upload an image.
- Then select the email address, and then select your image from bottom. Now it's associated with that email address. Click Save.
- It will take about 5-10 minutes to propagate on the internet, and then will appear on site.
Widgets
You can use any shortcodes in widgets. Just use text widget and put shortcode into it. Besides theme custom widget which may helpful for you. Listed below:
- Frenify Author
- Frenify Custom Categories
- Frenify Social
- Frenify Top Articles
Translation & Internalization
Theme comes with .po file included under the languages folder. To translate:
Method 1. Loco Translate
- Download and install Loco Translate.
- Go to Dashboard → Loco Translate → Themes and select Guff from the list
- Add on "New language".
- From the "Choose a language" select the language you want to translate
- From the "Choose a location" select languages/loco/themes/guff-{locale}.po (you can choose something else, it is just recommended)
- Click on "Start translating" button. And you can translate the theme to any language.
- After translating click on "Save" button
Please don't forget to change Site Language to the language you translated. You can change the site language in Dashboard → Settings → General → Site Language
Method 2. Poedit
- Download and install Poedit.
- Open guff.po file located here \wp-content\themes\guff\languages\ using poedit tool and translate the existing text to your own
- Save the file with the locale (for example: ru_RU.po).
If you have already setup WordPress in your language, you can get it from your wp-config.php file under, for example:define('WPLANG', 'ru_RU');In this case, you would save your file as ru_RU.po. - Step above should have generated a .po and a .mo file. Copy both these files and put them into the languages folder of the theme.
Your Language & Localization
After translating, you may wish to use the correct locale to translate and localize your WordPress installation completely. Refer to Installing WordPress In Your Language at WordPress Codex to learn how to.
How to?
- Backup and Remove the old version of the theme from your dashboard.
- Download new version of the theme from https://themeforest.net/downloads and upload it to your dashboard. Make sure that you are using latest version.
- Remove “Guff Core” plugin. Then, it appears as required plugin at the top of your dashboard. Re-install it.
If you are having problem with SSL (https://), you haven’t configured your wordpress properly. Please, check below plugin to configure SSL (https://)
Go “Settings - Permalinks”, choose “Post Name” from Common Settings and push “Save Changes” button.
Go “Dashboard - Guff - Theme Options - General - Page Title for Blog Single”, edit this field and click "Save Changes" button.
Go “Dashboard - Guff - Theme Options - General - Magic Cursor”, and you can manage them to change magic cursor options. There are 3 options to enable/disable magic cursor: Default, Link Hover and Slider(swiper). Default - cursor everywhere, Link Hover - cursor only on hover links, buttons, Slider(swiper) - cursor on sliders. You can enable/disable one or more fields. You can also change magic color in the option below - Cursor Color
Go “Dashboard - Guff - Theme Options - Main Colors” and you can change all main colors globally here.
Go “Dashboard - Guff - Theme Options - Logo” and upload your Dekstop Logo / Retina Logo here. Please don't forget to upload retina logo for users who visit your website from Retina Display.
Go “Dashboard - Appearance - Menus” and select (if you don't have any menus, create a new menu) your menu, in the "Display location" select Main Menu. It will means that this (selected) menu will appear in the desktop navigation.
Go “Dashboard - Guff - Theme Options - Desktop Navigation - Search Switcher” and you can enable or disable search button.
Hot Posts are all published posts sorted by their views count (by popularity for all time).
Go “Dashboard - Guff - Theme Options - Desktop Navigation - Hot Posts Switcher”. With this switcher you can enable or disable Hot Posts from your website. By clicking "Disable" option you can disable hot posts, but by clicking "Enable" button you can not enable hot posts at once. For enabling the hot posts you have to do one more thing: you have to create a new page with any title (for example: Hot Posts), select Hot Page option from the Template and publish this page. This page will help to display Hot Posts.
Go “Dashboard - Guff - Theme Options - Desktop Navigation”. Here you can find all options of the social list.
Social Icons - with this list you can disable and reorder all social list. "Eye" icon to enable/disable, "Hamburger" icon to change the order.
Facebook URL, Twitter URL and etc. fields to enter social platforms URL. If the URL field is empty this social platform will not display at the front-end.
Go “Dashboard - Guff - Theme Options - Typography”. And you can chang everything you want from google fonts.
In “Dashboard - Guff - Theme Options - Footer - Totop Switcher”.
Go “Dashboard - Guff - Theme Options - Footer - Subscribe Switcher”. Enable it and insert subscribe form shortcode into Subscribe Form Shortcode field.
You can insert any subscribe form shortcode into this field. But we have designed and integrated popular subscribe form:
Mailchimp - https://wordpress.org/plugins/mailchimp-for-wp/
- Install Mailchimp
- Connect it via API key
- Create a form
- In the Form code insert below code:
<div class="fn__subscribe">
							<input type="email" name="EMAIL" placeholder="Your Email *" required />
							<input type="submit" value="Subscribe" />
						</div>
In “Dashboard - Guff - Theme Options - Footer - Footer Copyright”. Just change this field to change footer copyright text.
Go “Dashboard - Appearance - Menus”. Click on "Screen Options" link (on the right top of the screen) and enable "Categories" from the Screen elements. And you can find new Categories tab in the Add menu items block.
Go “Dashboard - Appearance - Menus”. Click on "Screen Options" link (on the right top of the screen) and enable "Episode Items" from the Screen elements. And you can find new Episode Items tab in the Add menu items block.
Go “Dashboard - Appearance - Menus”. Click on "Screen Options" link (on the right top of the screen) and enable "Podcast Items" from the Screen elements. And you can find new Podcast Items tab in the Add menu items block.
Go “Dashboard - Appearance - Menus”. Click on "Screen Options" link (on the right top of the screen) and enable "Podcast Categories" from the Screen elements. And you can find new Podcast Categories tab in the Add menu items block.
You can enable/disable stocky post title in “Dashboard - Guff - Theme Options - Blog Single (wp post) - Post Title Sticky in Single Post”.
Autolading Posts is a great (needfull for you) option of the theme to increase your pageviews by engaging the site viewers to keep reading your content rather than increasing your bounce rate.
You can enable/disable this option in “Dashboard - Guff - Theme Options - Blog Single (wp post) - Autoloading Post Switcher”
Author Information Box is an helpful option to show short bio about post author.
In the demo you can see author image, name, short description and social URLs. But after importing a demo content, your author information box will show only author image and name. It is because we can't change your author information. Read below about how to add all author information.
How to add/change all author infromation?
Go to “Dashboard - Users”, edit author and in the bottom of the content you can find Guff extra profile Information. These fields will be used for author information box in single posts.
Image URL - insert author image URL here
Full Name - enter author full name here
Job - enter author job here
Information - enter author information here
Facebook URL - enter author Facebook profile URL
Twitter URL - enter author Twitter profile URL
Pinterest URL - enter author Pinterest profile URL
Linkedin URL - enter author Linkedin profile URL
Behance URL - enter author Behance profile URL
Vimeo URL - enter author Vimeo profile URL
Google URL - enter author Google profile URL
Youtube URL - enter author Youtube profile URL
Instagram URL - enter author Instagram profile URL
Github URL - enter author Github profile URL
Flickr URL - enter author Flickr profile URL
Dribbble URL - enter author Dribbble profile URL
Dropbox URL - enter author Dropbox profile URL
Paypal URL - enter author Paypal profile URL
Picasa URL - enter author Picasa profile URL
Soundcloud URL - enter author Soundcloud profile URL
Whatsapp URL - enter author Whatsapp profile URL
Skype URL - enter author Skype profile URL
Slack URL - enter author Slack profile URL
WeChat URL - enter author WeChat profile URL
ICQ URL - enter author ICQ profile URL
RocketChat URL - enter author RocketChat profile URL
Telegram URL - enter author Telegram profile URL
Vkontakte URL - enter author Vkontakte profile URL
RSS URL - enter author RSS profile URL
How to enable/disable author information box?
You can enable/disable this feauter in “Dashboard - Guff - Theme Options - Blog Single (wp post) - Author Information in Single Page”
Reactions block is one of amazing features of the theme.
Let's see all options of Reactions:
- Reaction Switcher - to enable/disable this block. Disabling this option doesn't mean that all datas will restored. All datas (counts of each reactions) will saved.
- Reaction Title Switcher - to enable/disable this block's title (on the top of the reactions)
- Reaction Title - block's title field. You can change Reactions' Top title here
- Reactions - all prebuilt reactions (10 reactions) switcher and order. Here you can change reactions' order (reorder them) and enable/disable.
- In Love Text - text for In Love Reaction
- Happy Text - text for Happy Reaction
- Not Sure Text - text for Not Sure Reaction
- OMG Text - text for OMG Reaction
- Angry Text - text for Angry Reaction
- Sad Text - text for Sad Reaction
- LOL Text - text for LOL Reaction
- Cry Text - text for Cry Reaction
- Silly Text - text for Silly Reaction
- Crazy Text - text for Crazy Reaction
-
Custom Reactions - you can also add your custom reactions. It is very bomb option. For that just dropdown first slide and do following actions
- Upload your reaction image by clicking on "Upload" button. Recomended size of image: 200x200. Recommended format of image: png
- Enter your reaction title into the second field where for placeholder text is "Reaction title"
-
Enter your reaction ID into the third (last) field. It is very important part of custom reactions.
1. Please use only english lowercase and uppercase characters and symbol _ (a-z, A-Z and _) For example: reaction_hot
2. Please after adding custom reactions don't change this field. Never ever. After some time you can change reaction title or reaction image but not reaction ID (this field).
3. What happens if you accidentally change the ID? Count of this custom reaction for all posts will show 0. If you remember old reaction ID, just enter it (old reaction ID) and everything will work fine.
Votes block is an very helpful voting system. Every blog site owner wants to be able to add this system. And this is very necessary now. To add this feature, you had to install a third-party plugin, figure it out and somehow insert it into the content, and it does not always work properly or does not fit the design of your site. Therefore, we have developed this system ourselves. It is easy to use. You just turn it on and that's it.
Let's see all options of Vote system:
- Votes Switcher - to enable/disable this block. Disabling this option doesn't mean that all datas will restored. All datas (counts of votes) will saved.
- Votes Title Switcher - to enable/disable this block's title (on the top of the votes)
- Votes Title - block's title field. You can change Votes' Top title here
Yes, you can add your custom CSS code to the theme without changing any files of the theme. Just go to “Dashboard - Guff - Theme Options - Custom CSS”
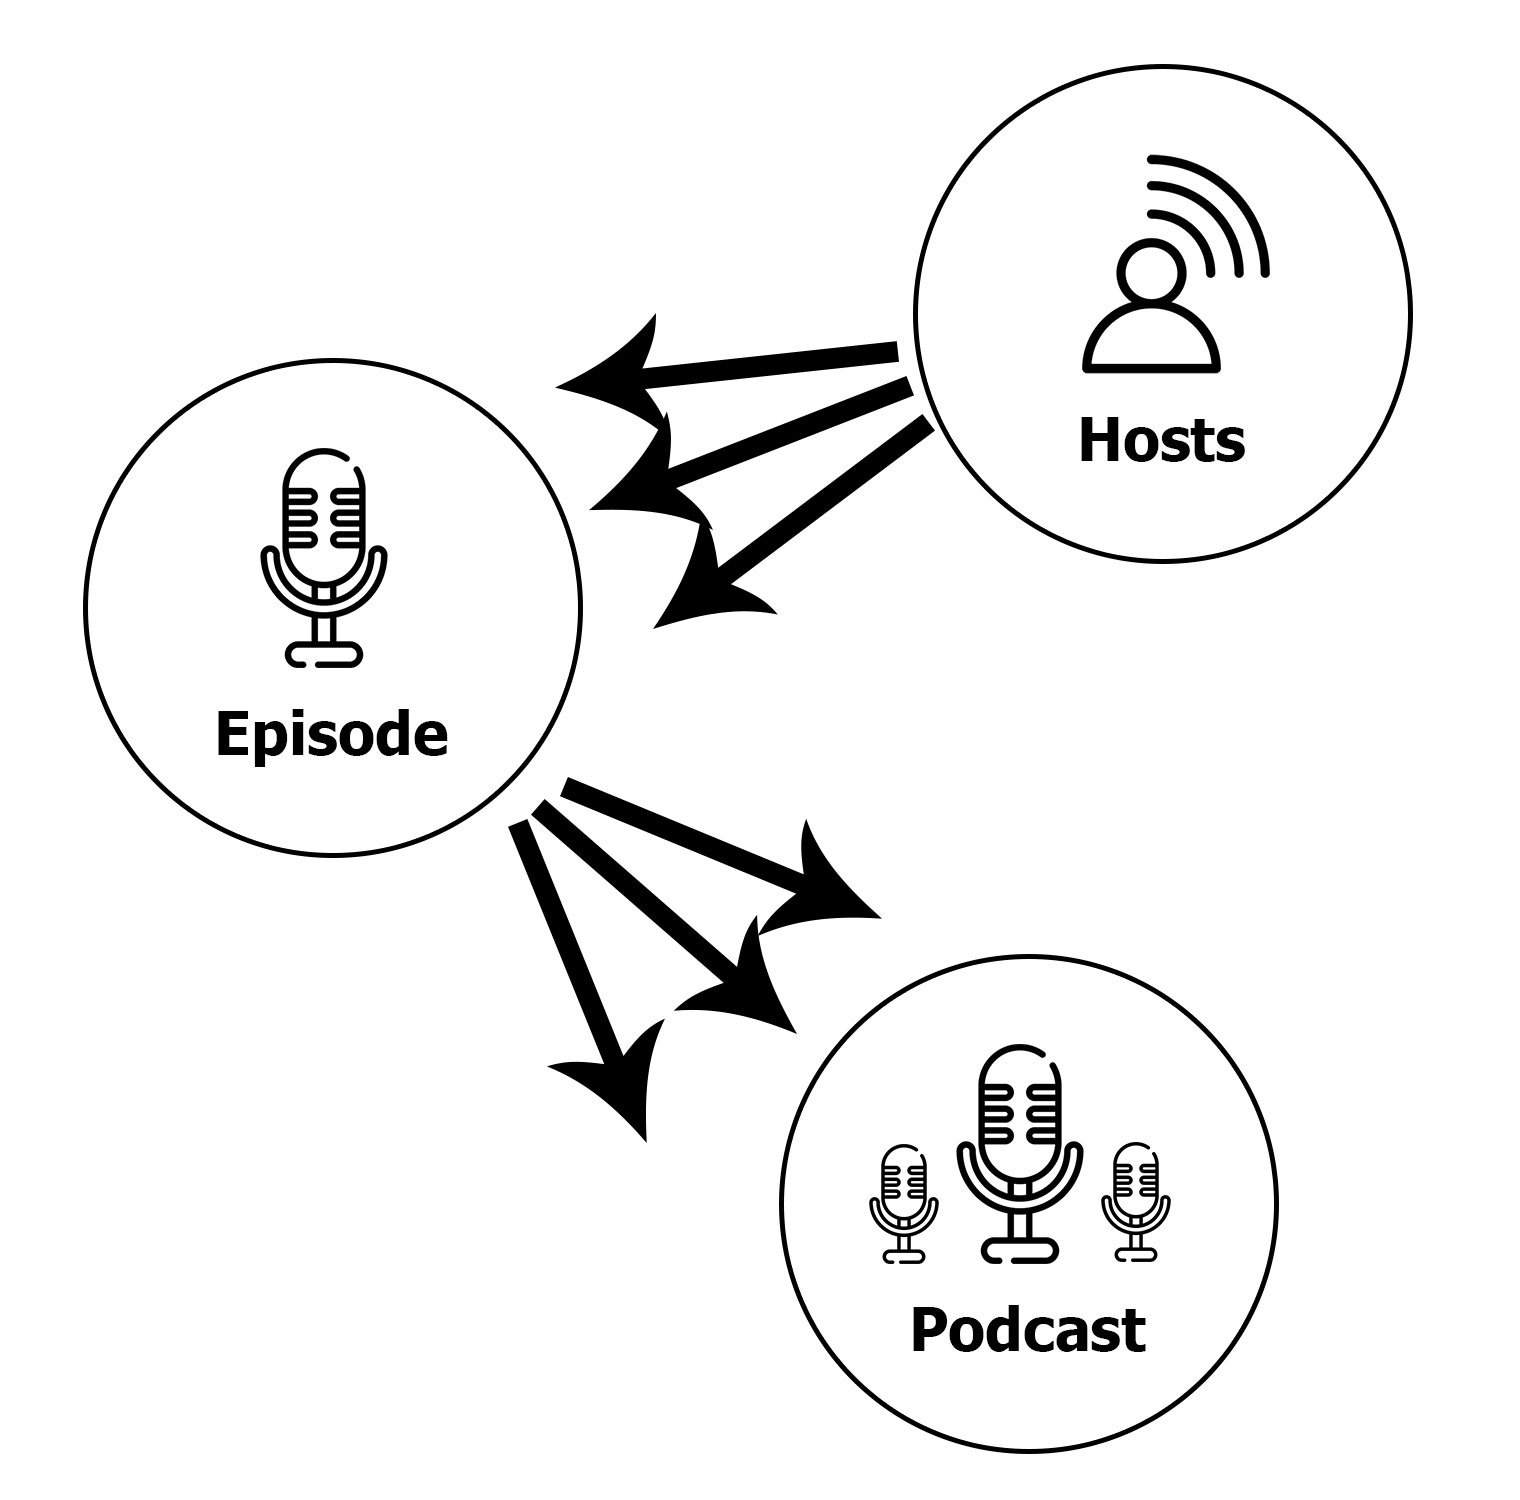
Episode - it is an attachable separate post type to publish your episode with mp3 file.
Host - it is a speaker/guest of your episode
Podcast - it is a separate post type to publish your podcast with attached episodes
- Go to “Dashboard - Episode Items” and click on Add New button
- Enter a title for this episode post
- Enter some content
- Choose Featured Image
-
In the Podcast Options configure this episode
- Select host(s) for this episode - here you can attach
Sure. If you don't want to get a whole demo you can import only home templates. XML file of the home pages are included in wpmain.zip file. This file is available in your themeforest downloads page: https://themeforest.net/downloads
After downloading the file, just go to Dashboard → Tools → Import → WordPress Importer, run it. Insert this file there and upload it. And you can create (main) Homepage by easy following steps:
- Add a new page
- Insert your Title
- Disable Page Title visibility in the page options (added by the theme)
- Publish your page
- Edit your page with Elementor (if you want to get a homepage, this POPULAR and FREE plugin is required)
- Add a New Container
- Click on Add Template (folder icon) button
- Go to My Templates section
- Find Home (main) or Home (podcast) and click on Insert button
- Click on Apply Button
- Update your page