Rankero - Ranking WordPress Theme
- Compatible with: WordPress 6.0 and greater
- Page Builder: Elementor
- Support: Fast & professional support team
- Documentation: Up-to-date and detailed
- Author Profile: https://themeforest.net/user/frenify/portfolio
Introduction
First of all, Thank you so much for purchasing this template and for being our loyal customer. You are awesome!
This documentation is to help you regarding each step of customization. Please go through the documentation carefully to understand how this template is made and how to edit this properly.
WordPress Requirements
Before you can use the Rankero theme, you need a working installation of WordPress.org on your hosting environment. If you're just starting out, you can follow the official guide on how to install WordPress here:
- Installing WordPress – Step-by-step setup instructions.
- First Steps With WordPress – A beginner-friendly guide to WP basics.
- FAQ for New Users – Common questions and answers for new WordPress users.
Having a basic understanding of how WordPress works (posts, pages, menus, media, etc.) will help you get the most out of your new theme.
Theme Installation
To use Rankero WordPress Theme, you must be running WordPress 6.0 or higher, PHP 7.4 and mysql 5 or higher version. Below is a checklist of items your host needs to comply with to ensure proper Rankero operation:
- Ensure your web host has the minimum requirements to run WordPress.
- Make sure the latest version of WordPress is up and running.
- If necessary, you can download the latest release of WordPress from the official WordPress website.
There are two methods to install the theme. If the normal installation method [a] is not supported by your web host, you can use the alternate option [b].
a) Normal Installation
- Log in to your WordPress Admin dashboard and navigate to Appearance > Themes.
- Click on Add New Theme (or the "Install Themes" tab for older versions) and then click Upload.
- Browse your computer to select rankero.zip (found in the extracted main.zip folder) and click the Install Now button.
- Once uploaded, click the Activate link to activate your theme.
b) FTP Installation (Alternate Method)
- Use FTP software to browse to the wp-content/themes folder on your web server.
- Upload the extracted rankero folder (from rankero.zip).
- Once the upload is complete, log in to your WordPress Admin dashboard and navigate to Appearance > Themes.
- Click the Activate link to activate your theme.
Installation Video
Demo Content Import
Before we start to import a demo content we have do following instructions:
-
Set up PHP Configuration limits
Issues you may encounter, such as demo content fails when importing and similar issues, are generally related to excessively low PHP configuration limit settings. You can either increase these limits on your own, or contact your web host and ask to have the limits increased to the following minimums:
- memory_limit - 256M
- max_input_vars - 5000
- max_execution_time - 600
- post_max_size - 64M
- upload_max_filesize - 64M
- allow_url_fopen - ON
-
Verify your PHP limits
You can check them by installing the WordPress phpinfo() plugin and checking Settings. The first column refers to your installation value, and the second column refers to the limits of your host. The latter values are often lower if you have selected a cheaper hosting package.
Now we are ready to import a demo content
There are two methods to import a demo content. If you have SSL Certificate on your website you can use method [1] One Click Demo Importer (auto), but if you have not installed SSL Certificate or you couldn't import a demo content via method [1] you can use method [2] with XML File (manually).
Let's take a look at both methods.
One-Click Demo Importer
- Go to Dashboard > Rankero > Import Demo Data
- Click on Import Demo Data button
- Click on Continue & Import button
- Ready
Manual Import (if One-Click Demo Importer failed)
- Go to Tools >> Import, select WordPress Importer, and run it.
- Locate the xml folder inside the main.zip file.
- Select the XML file corresponding to the demo you want to import and upload it.
Reviews
Reviews Posts are designed for publishing structured reviews about any creative or notable subject — movies, music, books, games, products, or anything else that can be evaluated and presented with detailed information.
Each review post contains its own content, excerpt, media format, details, and rating system, making it a powerful and flexible content type for editorial and ranking purposes.
- Content & Excerpt
Every review includes a full content area and a short excerpt. The excerpt is used in listings, cards, and ranking blocks to quickly summarize the review. - Post Formats
Reviews support three formats:- Standard — regular post layout
- Gallery — image-based presentation
- Video — video-focused review format
- Details (Specifications)
You can add structured information in a label : value format. For example:- Director : Christopher Nolan
- Release Year : 2023
- Genre : Sci-Fi
- External Link
Each review can include a dedicated external link related to the subject. For example, a movie review can link directly to the official movie page, streaming platform, or IMDb. This link is reusable and can be displayed across the site wherever the review appears. - Tags
Reviews support tagging for flexible organization and filtering. Tags help connect related reviews and improve navigation. - Ratings System
One of the key features of Reviews Posts is the built-in rating system:- Expert Rating — rating provided by the author/editor
- User Rating — rating submitted by visitors
Integration with Ranking Posts
Reviews Posts are used inside Ranking Posts to build structured lists such as “Top Movies”, “Best Albums”, or “Must-Read Books”. Ranking posts collect individual reviews and organize them into curated lists based on ratings, categories, or editorial selection.
This makes Reviews Posts not only standalone articles, but also building blocks for dynamic ranking and recommendation content across the website.
How to add a Review Post
Rankings
Ranking Posts are a powerful content type built to create real, dynamic rankings based on both editorial choice and user interaction. This is not just a static list — it is a living system where positions can change over time.
Ranking Posts combine structured content, attached reviews, and a front-end voting mechanism to produce authentic, community-driven rankings.
-
Main Content
Each ranking post includes a full content area where you can explain the idea behind the list, add context, editorial notes, or methodology. -
Voting Rules
You can add custom voting rules displayed on the front-end as text. This helps users understand how voting works and what criteria should be considered. -
Featured Image
Each ranking post supports a featured image for visual presentation in listings and previews. -
Categories
Ranking posts can be organized using categories for better structure and navigation across the site. -
Collections
You can group rankings into collections, making it easier to manage multiple lists and build thematic hubs. -
Excerpt
A short description used in cards, archives, and previews to quickly explain what the ranking is about. -
Attached Reviews
Ranking Posts are built around Reviews Posts. You attach reviews to the ranking, and the system preserves the order exactly as they were added. This forms the initial editorial structure of the list. -
Front-end Voting System
This is the core feature that makes Ranking Posts truly unique. Visitors can vote directly on the front-end and influence the position of each review inside the ranking. Reviews can move up or down depending on user votes, creating a real, evolving ranking shaped by the audience — not just a static “Top list”.
Why this matters
Most themes and plugins only allow fixed lists or manually sorted posts. Ranking Posts go further by combining editorial control with real user participation.
The result is a dynamic ranking system where:
- Editors define the starting structure
- Reviews provide detailed evaluation units
- Users influence positions through voting
- The ranking evolves naturally over time
This makes Ranking Posts ideal for:
- Top movies, albums, and books
- Best products and tools
- Community-driven lists
- Editorial recommendations with audience feedback
Ranking Posts transform simple lists into interactive, living rankings — something rarely implemented in traditional themes and standard post systems.
How to add a Ranking Post
Gag Mode
Gag Mode is a highly interactive content feed designed for exploring, enjoying, and engaging with memes, images, and videos in a seamless and fun way. It is like a mini social hub where content discovery meets community interaction.
This mode can be enabled in Theme Options and is packed with features to make browsing and interacting with media effortless and enjoyable.
-
Layouts
Gag Mode currently supports three layouts, giving you flexibility in how content is presented:- Voting 1
- Voting 2
- Voting 3
-
Pagination Options
Three types of pagination are available to suit your browsing style:- Classic — standard page-by-page navigation
- Load More — click a button to load additional posts
- Infinite Scroll — content loads automatically as you scroll
-
Content Discovery
Users can simply scroll through the feed and enjoy memes and posts. Advanced filtering is available by:- Category
- Tag
- Author
-
Media Hosting Flexibility
To reduce server load, featured images and videos (for video-type posts) can be loaded from any external hosting. Dedicated metabox fields allow you to define external URLs for seamless integration. -
Engagement Features
Users can interact with content in multiple ways:- Comment on posts
- Vote (upvote/downvote)
- React with emojis or reactions
- Share posts on social media
- Copy the post URL
Gag Mode transforms static media into an interactive, scrollable, and community-driven experience — a feature that elevates your website beyond standard blogging or gallery layouts.
Adding Posts
Adding a new post is the same way as default WordPress installations, however, there are extra options that might need explaining.
>> Featured Image
While the theme can function without featured images, it's highly recommended that you add a featured image to each post. This not only makes your site/blog more lively but also improves user experience.
To set the featured image, use the WordPress normal method.

>> Recommended Image Size (for Blog Posts)
Image size (dimensions) will depend on what type of layout you're using throughout your WordPress installation or per individual post basis. This image will not only be used on the post, but also on the category listing pages.
Compatible with all layouts and default slider: 1920 x auto (width x height)
>> Supported Post For
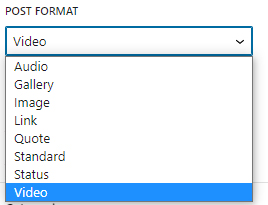
Rankero supports 7 post formats. These are:
Gallery Format
- Click "Add Image" button
- Choose Images
- Click "Select" button
See below screenshot

Image Format
Image format works very similar to a standard post. Just set a featured image and you're done.
Standard Format
Just set a featured image and you're done.
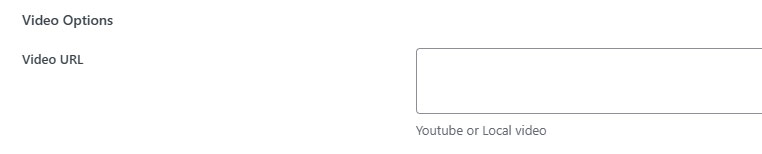
Video Format
Setup your post normally and set a featured image. Copy your youtube or local video URL and paste into the "Video URL" box.
See below screenshot
Author Avatar
For the author avatar, our theme uses the Image URL specified in the Rankero Extra Profile Information section. If you don’t enter your own Image URL, the theme will default to using Gravatar.
(A GIF is also provided to show how to insert your own avatar into the Image URL field in the Rankero Extra Profile Information section.)
Widgets
You can use any shortcodes in widgets. Just use text widget and put shortcode into it. Besides theme custom widget which may helpful for you. Listed below:
- Frenify Ad.
- Frenify Author
- Frenify Custom Categories
- Frenify Donations
- Frenify Followers
- Frenify Social
- Frenify Subscribe
- Frenify Top Articles
Translation & Internalization
Theme comes with .po file included under the languages folder. To translate:
Method 1. Loco Translate
- Download and install Loco Translate.
- Go to Dashboard → Loco Translate → Themes and select Rankero from the list
- Add on "New language".
- From the "Choose a language" select the language you want to translate
- From the "Choose a location" select languages/loco/themes/rankero-{locale}.po (you can choose something else, it is just recommended)
- Click on "Start translating" button. And you can translate the theme to any language.
- After translating click on "Save" button
Please don't forget to change Site Language to the language you translated. You can change the site language in Dashboard → Settings → General → Site Language
Method 2. Poedit
- Download and install Poedit.
- Open rankero.po file located here \wp-content\themes\rankero\languages\ using poedit tool and translate the existing text to your own
- Save the file with the locale (for example: ru_RU.po).
If you have already setup WordPress in your language, you can get it from your wp-config.php file under, for example:define('WPLANG', 'ru_RU');In this case, you would save your file as ru_RU.po. - Step above should have generated a .po and a .mo file. Copy both these files and put them into the languages folder of the theme.
Your Language & Localization
After translating, you may wish to use the correct locale to translate and localize your WordPress installation completely. Refer to Installing WordPress In Your Language at WordPress Codex to learn how to.
How to? (FAQ)
The issue occurred because you attempted to install the main.zip file into your themes. This file contains additional resources such as plugins, documentation, XML files, and the child theme. To install the theme correctly, unzip the downloaded file, locate the rankero.zip file, and upload it to your themes.
The wpmain.zip file you downloaded from the ThemeForest downloads page contains the Rankero Core plugin locally. To access it, unzip the wpmain.zip file, and inside, you will find a folder named plugins. Within this folder, you’ll locate the rankero-core.zip file. Manually install this file through your WordPress dashboard by navigating to Plugins >> Add New.
If you encounter issues with Automatic Demo Importing (One Click Demo Importer - OCDI), you can manually import the demo content by following these steps:
- In the main file you downloaded from the ThemeForest downloads page (https://themeforest.net/downloads), locate the demoassets folder. Inside, select the XML file you wish to import. For example: news-content.xml.
- Log in to your WordPress dashboard and navigate to: Dashboard > Tools > Import. Choose the WordPress Importer, install it if necessary, and upload the selected XML file.
Go “Dashboard - Settings - Permalinks”, choose “Post Name” from Common Settings and push “Save Changes” button.
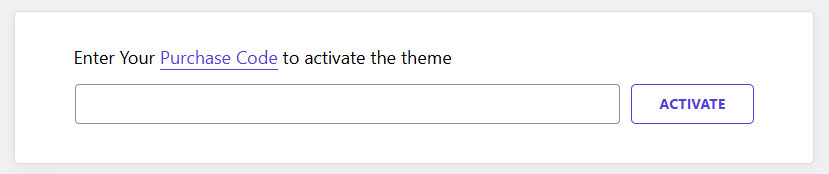
- Copy your purchase code. About how to get it read this article
- Go to Dashboard > Rankero
- Insert copied code into the field and click on Activate button
- Go to Dashboard > Rankero
- Click on Revoke Button

- Install the Envato Market Plugin.
- Go to Dashboard > Envato Market > Settings and follow the steps to fully activate the plugin.
- Update the Theme: Navigate to Envato Market > Themes and click the "Update" link next to your theme.
- Update the Rankero Core Plugin: After updating the theme, you will see a notification: "New Version Available: A new version of the rankero-core plugin is available." Click the "Update Now" button in the notification to automatically update the plugin.
Alternative Update
- Log in to your WordPress dashboard.
- Deactivate and delete the Rankero Core plugin from the Plugins page.
- Download the latest theme files from your ThemeForest downloads page.
- Locate the rankero.zip file in the downloaded package, then upload and install it via the Appearance > Themes section, replacing the existing Rankero theme.
- Install and activate the required plugins when prompted.
- Your posts, pages, media, and menus will remain intact.
- Custom options managed outside the theme (e.g., third-party plugins) will remain unchanged.
- Settings from plugins or WordPress core (e.g., general settings, users, etc.) will not be affected.
If you are having problem with SSL (https://), you haven’t configured your wordpress properly. Please, check below plugin to configure SSL (https://)
The Rankero theme offers three methods for adding advertisements. You can also use alternative methods, such as third-party plugins or by adding code directly to your content.
- Via Theme Options >> Advertising
- Appearance >> Widgets
- Elementor
1. Ads via Theme Options:
The advertising options in the theme allow you to add advertisements to six predefined locations. You can use a custom banner with a custom URL for your ad or insert ad codes, such as Google AdSense or any other ad platform that provides code for integration.
- Off-Canvas - Displays your ad before the header of your website across all pages (site-wide).
- Header Below - Displays your ad below the header of your website across all pages (site-wide).
- Footer Above - Displays your ad above the footer across all pages (site-wide).
- In-Feed Ads - Displays your ad between posts on archive pages, blogs, and homepages (when the Home Page template is selected). You can specify banner positions, enabling ads to appear multiple times. For example, after the second post, fifth post, sixth post, etc.
- Single Post: Inside Content - Displays your ad within the content of a single post.
- Single Post: After Content - Displays your ad below the content of a single post.
2. Ads through widgets
The Rankero theme offers you add your ad. using Frenify Ad. from the widgets to your sidebar (main sidebar, off-canvas, footer sidebars etc.). Check below screenshot:
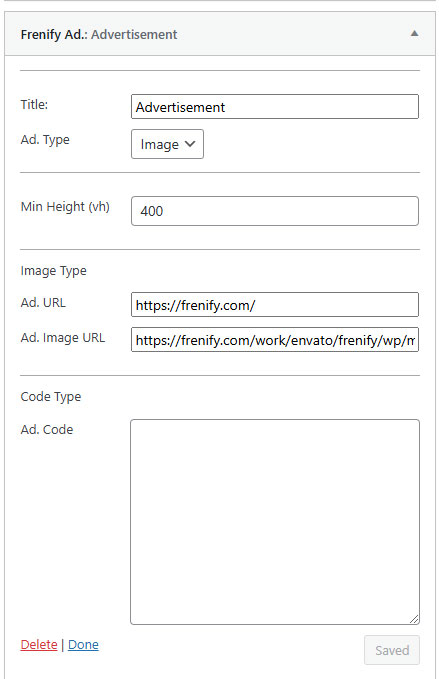
You can configure its Title, select the Ad. Type (image or code) for banners or Google AdSense, set the Min Height (vh) to make the ad sticky in your widgets, and use the Ad. URL and Ad. Image URL fields for banners or the Ad. Code field for Google AdSense.
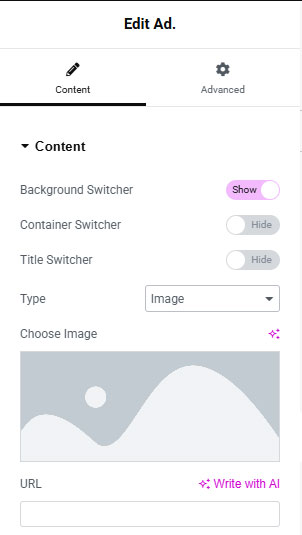
3. Ads through Elementor
Edit your page with Elementor. In the Elementor Left Panel, locate the Ad. widget labeled Rankero. This widget also includes all the options available in Frenify Ad. See the screenshots below. (1) The first screenshot shows the widget in the Elementor Left Panel. (2) The second screenshot displays the widget options after it has been added to your page.

Add/Edit/Remove
Go “Dashboard - Rankero - Theme Options - Logo” and upload your Dark Logo, Light Logo, Mobile Logo here.
Go “Dashboard - Rankero - Theme Options - General - Page Title for Blog Single”, edit this field and click "Save Changes" button.
Go “Dashboard - Rankero - Theme Options - General - Magic Cursor”, and you can manage them to change magic cursor options. There are 3 options to enable/disable magic cursor: Default, Link Hover and Slider(swiper). Default - cursor everywhere, Link Hover - cursor only on hover links, buttons, Slider(swiper) - cursor on sliders. You can enable/disable one or more fields. You can also change magic color in the option below - Cursor Color
Go “Dashboard - Rankero - Theme Options - Main Colors” and you can change all main colors globally here.
Go “Dashboard - Rankero - Theme Options - Typography”. And you can chang everything you want from google fonts.
In “Dashboard - Rankero - Theme Options - Floating Bar - Totop Button.
Autolading Posts is a great (needfull for you) option of the theme to increase your pageviews by engaging the site viewers to keep reading your content rather than increasing your bounce rate.
You can enable/disable this option in “Dashboard - Rankero - Theme Options - Blog Single (wp post) - Autoloading Post Switcher”
Reactions block is one of amazing features of the theme
Let's see all options of Reactions:
- Reaction Switcher - to enable/disable this block. Disabling this option doesn't mean that all datas will restored. All datas (counts of each reactions) will saved.
- Reactions - all prebuilt reactions (10 reactions) switcher and order. Here you can change reactions' order (reorder them) and enable/disable.
- Like Text - text for Like Reaction
- Dislike Text - text for Dislike Reaction
- Love Text - text for Love Reaction
- Laugh Text - text for Laugh Reaction
- Surprised Text - text for Surprised Reaction
- Sad Text - text for Sad Reaction
- Angry Text - text for Angry Reaction
-
Custom Reactions - you can also add your custom reactions. It is very bomb option. For that just dropdown first slide and do following actions
- Upload your reaction image by clicking on "Upload" button. Recomended size of image: 200x200. Recommended format of image: png
- Enter your reaction title into the second field where for placeholder text is "Reaction title"
-
Enter your reaction ID into the third (last) field. It is very important part of custom reactions.
1. Please use only english lowercase and uppercase characters and symbol _ (a-z, A-Z and _) For example: reaction_hot
2. Please after adding custom reactions don't change this field. Never ever. After some time you can change reaction title or reaction image but not reaction ID (this field).
3. What happens if you accidentally change the ID? Count of this custom reaction for all posts will show 0. If you remember old reaction ID, just enter it (old reaction ID) and everything will work fine.
Yes, you can add your custom CSS code to the theme without changing any files of the theme. Just go to “Dashboard - Rankero - Theme Options - Custom CSS”